Tuesday, December 31, 2013

Resolving not to resolve

I dont know that I have ever actually formally made a new year's resolution,  but personally I think it is a terrible time to take on new things.   I get it,  there is a calendar reset, everything is starting over again.  But,  if you are anything like most people, you are coming off an insane holiday season, work just got crazy to close out the year, and for you stay at home parents out there,  you have had the kids in the house for almost 2 weeks with no school.

I think if anything January 1st is a perfect time to resolve not to resolve to do anything,  but to rather recover, and reset your "normal" life and schedule.

I mean, really, thursday you are heading straight to the gym, firing up that home business, throw out all the junk food, or reading the book of Genesis?  No wonder so many people feel so discouraged by February.

So as not to be too negative,  I do have an alternative idea.   Instead of resolving to do something that requires an immediate start, and full attention,  why not use the calendar year as an opportunity to set your real goals for the whole year?   If it is about what you want to do in 2014,  then you can still take the first week, be real with yourself, put a real plan together, and go get it in week 2 rather than giving up on it.

So here you are, tonight you get to make that commitment you have been thinking about for the past few weeks,  or at least since eating 6 too many Christmas cookies.  Be real with yourself, and make 2014 the year you want it to be, rather than letting it tell you that you can't.

As for me, I have this horrible habit in my etsy shop.  I have been running it since 2007,  it is a hobby for me,  but I always wait to make somethting new until I sell out of everything.  Not really a great strategy.  So for 2014,  my goal is to not let it get empty.  I dont need to make a certain amount each month, or sell so many items,  just not let it get empty.  What do you think,  will I make it?


What is your resolution?  Or are you resolving not to make a resolution?  Or do you have a completely different take on this than I do?  Whatever your plans hold,  I hope you stay safe tonight,  and have a fantastic 2014!!

Tuesday, December 17, 2013

How to find a Christmas Tree

When it comes to picking out that perfect tree,  it can get a little tricky.  Especially if your wife is 9 months pregnant and sends you out on your own to get it.  That is exactly the situation I found myself in last year.

I dont make those kind of decorating decisions without her,  but she had no interest in walking around outside for hours tree shopping.

Ultimately,  I got one,  after returning to the house 2 times saying I didnt think that I could do it.

This year with a 1 year old,  we decided to go with the small table tree that he cant pull on or try to eat.

The thoughts of that fateful shopping trip still run through my head though,  and that is where this video stems from.

Friday, December 6, 2013

How to Decorate with Poinsettias

So here they are in the van.  I was pretty excited about getting them home and seeing how my wife integrated them into her holiday decor that she had been working on.  There is one key problem with Poinsettias though (aside from pronouncing them)  They almost always come in this hideous foil wrapping around the pot!

While in the lobby of a corporate building,  or in a business window display this may work ok,  it is not really part of our style.  I mean I am all for shiny gold,  but in a different format entirely.

So I love the plants, but hate how they look,  and dont really want to just remove the foil and leave the plain plastic pot either.  The good news is that all hope is not lost.  We grabbed a roll of wrapping paper that has an old print pattern on it to look like a book or newspaper.
 Cut it to size, pull the sides up over the pot,  and wrap with a string.  You could use a rubbber band here as well.  Given that we have 2 elementary age boys in the house,  rubber bands are never hard to comeby here.  I will say though,  you will need a bigger one than the kind everyone is making jewelry out of.  but a piece of string will do just fine too.


And there you have it.  a piece that fits the decor,  without breaking the budget!

Monday, November 25, 2013

The Personality of Paint

Paint can be colored and go on a wall
or paint can be primer you wont see at all
it can warm up a room on a cold winter night
or cool off a sun porch to make it just right.

brushes and rollers large spots and trim
a color for her, and a color for him
so pull out your paintbrush and manage a way
find a color you love, and paint something today.

Friday, November 22, 2013

How to restore furniture / The Upcycled Dresser

In my opinion, there is a difference between refinishing and restoring furniture.  In fact what I enjoy most actually doesn't fall into either category.   I like to give old furniture new life,  maybe even re-purpose or upcycle,  so the terminology of the project,  is really not as important as creating something that you love.

In this case,  I saw a craigslist add for a free dresser,  no picture,  and it was sitting curbside.  I thought,  "hey,  if I can cram it into the back of my Mazda 3,  this may be fun." On a side note,  a Mazda 3 with the seats down,  functions a lot like a pickup truck.  Not as convenient,  but I did get the dresser home.


This is what it looked like out of the car


First I removed the drawers


The back was in rough shape,  so it was removed as well


Part of the original plan was to create a new back,  I traced the old one onto a new piece of wood,  filling in any missing corners with proper right angles


Then PAINT PAINT PAINT

The top "drawer" is actually a fold out shelf which I thought was really cool. so I left it.

I thought it could use shelves where the drawers used to be.

A nice walnut stain can really transform a piece of wood

now its starting to look like something new

This is the inside of the fold down top.  It needs to be painted


I used chalkboard paint,  as I thought if it were a bar, one could store recipes there


Something had to be done about the knobs though,  they didn't really work with the piece anymore


There thats better.
So for me, restoring this piece meant giving it a new purpose and life.  Refinishing it too, or upcycling.   but like I said, as long as you love the process,  and like how it comes out,  what you call it is not all that important!


Monday, October 28, 2013

What does the Fox Say - Halloween Costume

So did you just get invited to a Halloween party,  and need a witty costume?  Or just haven't thought of the perfect idea for the kids,  and don't want to do witches and ghosts AGAIN!  Fear not,  While you don't need the full fur costume,  making you or your child look like a fox,  then hold a handmade question mark speech bubble,  will definitely be an instant hit!

See here if you have been living under a rock for the past few months. (I'm kidding) 
Click here to buy the costume in this photo (sign not included)

Sunday, September 29, 2013

Thursday, September 19, 2013

Fall Gardening


So the flowers are fading, the frost is coming,  and the rain knocked over everything tall.  The garden is on its way out right?

Well I certainly hope not.  The cold frames have nice spinach and carrot seedlings doing great,  and with a little work,  those sunflowers have been moved to a new spot.


 The Honeybees are working hard on the Cosmos,  and the green tomatoes are ready to become Salsa Verde.


 It is a beautiful day,  and the garden remains full of life!!

Wednesday, September 11, 2013

Free Advice Arrow

I am always looking for a new project.   Which is ironic, because I definitely dont need any more on my plate,  and I dont really have any space for anything new.    So when I saw a huge pile of wood in a free pile last week,  my sensible self decided,  "you dont need that,  and you have no place to put it"  and my crafty self decided "we will make room,  its FREE"

I had been asked to make arrows for the house,  and I figured I could do it with the free wood.

Step one,  measure the arrow.  I wanted to make sure it was straight,  so I went and measured from every side,  drawing,  and redrawing my lines.


Then make the cuts.  I used a jig saw,  as I don't have a table saw,  and it was the easiest.  I cut along all my carefully measured lines,  and soon had a plywood arrow.

 I didn't want to be done though,  It just felt a little naked.   So I did what I always do to naked wood,  I painted it.

 I had previously shown my wife all the colors of spray paint that we had my making stripes on this wood,  so it made sense to take that side,  and make it the front,  to paint over all the samples


As it always seems to,  teal won the vote,  and soon I had a nice big teal arrow.

.
But it still didnt feel done,  I wanted it to stand out more,  (I know the bright teal stands out) as a piece that I made.  so I had an idea.  What if I made it into a sign?

I grabbed some old vinyl letters,  and tape,  and designed my "Free Advice" arrow.  I thought it was funny,  because everyone seems to be offering free advice these days,  whether you want it,  or not.


Once it was all taped off,  I painted it again,  this time with black paint.  This made the teal still pop,  but not take over a room the way it would have.


It worked like a charm,  the teal letters were left when I removed the vinyl.


And so now here it is,  a customized,  completed project,  all from some free scrap wood.  Next time you see something that you think you might use later,  pick, it up,  If you dont use it in a month,  get rid of it,  or if you do use it,  then you have a cool piece,  and a story to go with it.   There is some Free Advice


Sunday, May 26, 2013

10th Anniversary Gift :Tin

So if you follow the traditional anniversary gifts,  there are a lot of years where finding something meaningful that follows the medium you are supposed to use is tricky.  For example,  we just celebrated our 10th anniversary on Thursday.  10 years is a big deal,  you would think the gift would be a car, or a house, or some big jewel.  but nope,  tradition says that year 10 is Tin / Aluminium!

So I started to think,  I suppose there is a nice car out there made mostly of aluminium,  or maybe some earrings,  hammered tin?  I am at a loss.  I googled it thinking I couldn't be the first not to know what to do for tin.  I came up pretty empty though.  I even looked on pinterest (which if you know me,  is a pretty big deal) for ideas around 10th anniversary,  and these 2 metals,  there wasn't a lot there either.

One thing I did find in all that searching was how to make candle holders out of old cans.  I thought about it, and decided that it could work,  if somehow I could incorporate the 10th anniversary into the candle holder project.  AH HA!!!  I will get 10 cans,  number them; 1 to 10,  and have them get bigger by the can!  My idea was in place,  only one problem.  I did not have 10 cans.   Which brings me to step 1

Step 1: Have 10 cans

Step 2 could be to start cleaning the cans, but I think that mentioning this part is important too.   When I was at the store,  I was so focused on getting 10 different growing can sizes,  that I paid absolutely no attention to what I was buying.  With the exception of the sauerkraut  and Vienna Sausage,  it was actually mostly all foods that we eat.  The problem?  I cant just tell my wife that I bought a bunch of canned goods,  and we should have a casserole.   So I am not proud of this next part, but no,  I didn't eat any of this.  Although I also didnt waste it.  It went straight into the compost bin,  and will supplement the veggie garden through out the season,  so I will actually be eating it,  eventually.


So here is the real step 2: empty the cans (preferably use the food inside,  or use cans that you already had empty) KEEP THE LIDS!!!


Now that you have 10 empty cans,  you will need to clean them.  This is important especially if you bought things like mushrooms, and sauerkraut,  because no one wants a gift that smells like that ... Gross!

Step 3: Wash the cans

Step 4 is really just an extension of step 3,  but is very important to do before step 5,  step 5 just doesnt work if you dont do step 4.  I know because I accidentally tried it.

Step 4: Dry the cans


Steps 5 and 6 are pretty interchangeable,  as long as the cans are now dry.   If you have ever seen my Etsy Shop,  you know that I like a distressed look,  so I painted the cans before putting the holes in them.  I figured,  if they got a little scratched it would look cool.  

Step 5: Paint the cans

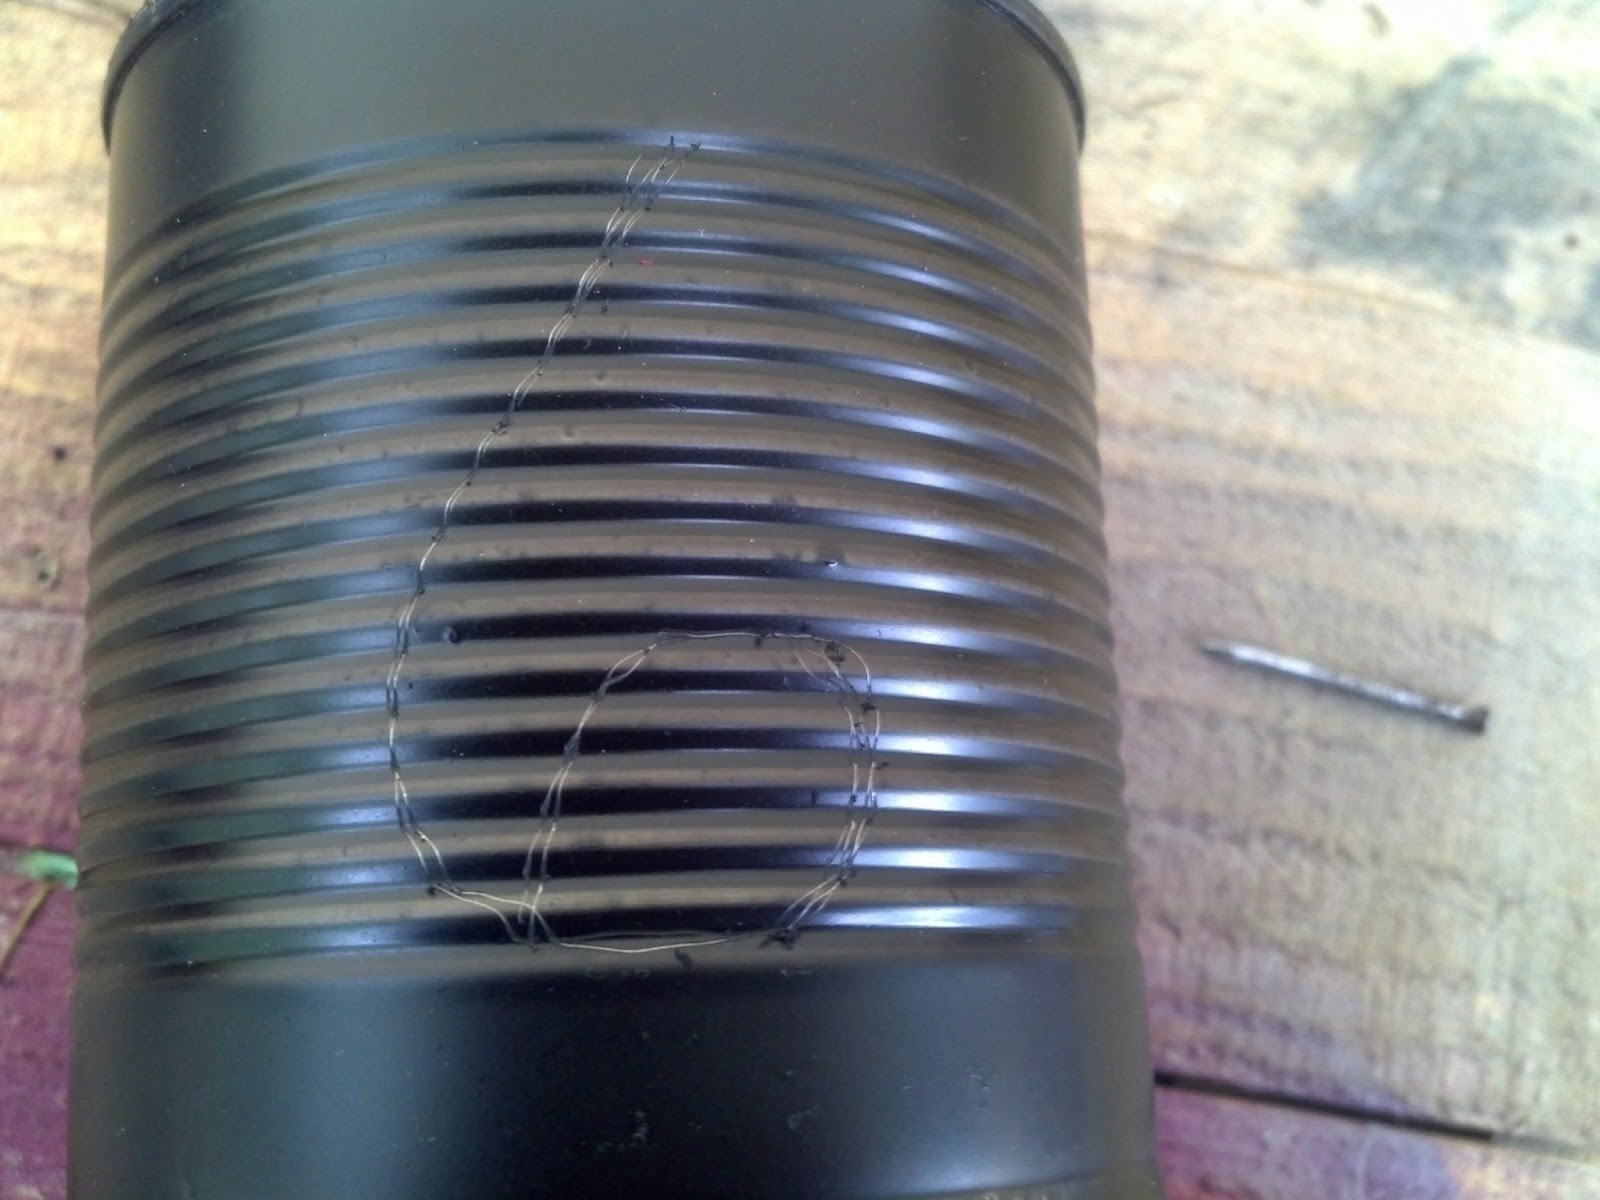
next,  using a small finish nail, and a hammer,  we will put the numbers into each can.  When hammering the nail toward the bottom of the can,  it is relatively easy as the cans structure holds up.  However when hammering the nail toward the open top, the can tends to want to fold in half,  especially the smaller ones.  This is why I said to keep the lids in step 2.   Put the matching lid back onto the can,  and hold it tightly.  you can use tape, or press the can against the side of the workbench to hold the cover on as you hammer it with the nail.  The smaller the nail you use,  the less resistance you will have, but it is also less light at the end.

Step 6: punch holes in the cans

 Here I scratched the number into the paint as a guide.


At this point (ok technically before this point) I realized that buying the cheaper coffee, didnt pay, because it is not tin, or aluminium, its cardboard.  Not a huge deal,  because it actually allowed me to carve the whole word into it rather than just the number,  setting 10 apart from the rest as it is the whole point.


At this point it should look something like this,  I know what you are thinking,  and I dont really like the way the 9 looks either.


Once you have all the holes punched,  you are ready to go.  You will need 10 tea lights,  or other candles,  light them carefully,  and place them in each can.   line them up somewhere you spouse can see them,  and you have yourself a handmade anniversary gift, that represents your 10th anniversary,  and sticks to the traditional material!

Step 7: Light 'em up!!


Oh,  and yes,  we will be going away together for our anniversary later in the year.  We wanted to wait for the baby  to be a little older before we left him for the weekend.